Microblog : A very long article Wikipedia article on the orientation of toilet paper [7 jun à 22:52] [R]

Mercredi, 27 août 2008

Card Sleeve Hacking

Traduction: [ Google | Babelfish ]

Catégories : [ Bricolage ]

Earlier today I managed to reduce the width of a card sleeve using a soldering iron.

I just finished to make sleeves for the 20 Citadels cards. I worked on a piece of mirror and used an aluminium ruler to guide the tip of the soldering iron (it didn't become hot, the contact time was too short compared to the size of the ruler).

I botched every second sleeve at the beginning, because I put the card into the sleeve before welding it: the thickness of the card was enough to prevent the two layers of plastic to fuse properly, and the top layer was tearing along the weld. The solution is to weld it without the card, leaving enough space inside the sleeve for the card width plus 2 mm, cut along the seal with a hobby knife (leaving about 1 – 2 mm of seal), and then insert the card. The top of the sleeve can also be cut with the hobby knife (welding it with the card inside won't probably work well, for the same reason as above).

[ Posté le 27 août 2008 à 23:56 | pas de commentaire | ]

Dice Tower Complete

Traduction: [ Google | Babelfish ]

Catégories : [ Bricolage ]

dice_tower_complete_4

Finally, my dice tower is complete. The core is made of wood (probably spruce or pine), the walls are 4mm polycarbonate and the screws are 3.5 x 16 mm with a bronze finish (I thought they would look better than the usual brass-finish ones which would have maybe blended with the wood. Or not.) The total weight is slightly above 1.9 kg (that's not heavy, it's stable).

The slopes are covered with some kind of rubber from the back of a very ugly mouse pad; this forces the dices to roll instead of sliding down the slopes and increases the randomness (in theory at least). Grey is not the best color, but it's all I had at hand. I glued it with contact glue.

I'll publish statistical information about the dice rolls some day if I have the courage to make a Χ2 test.

dice_tower_complete_1 dice_tower_complete_2 dice_tower_complete_3

[ Posté le 27 août 2008 à 23:56 | 2 commentaires | ]

Colle polyuréthane

Catégories : [ Bricolage | Livres ]

J'ai mentionné dans mon article sur la reliure l'utilisation possible de la colle polyuréthane (PU). Je m'y suis enfin frotté, je le résultat est intéressant. Par rapport à l'utilisation d'une colle blanche classique (PVA, acétate de polyvinyle), voici ce que j'en pense:

Pour la PU:

  • elle ne fait pas se gondoler le papier, contrairement à la PVA
  • elle gonfle légèrement et donc remplit mieux les trous, en particulier elle s'insère entre les pages sur 5 mm et les fait mieux tenir entre elles
  • elle fait une reliure assez souple (la PVA aussi, mais un peu moins et d'aspect plus « cassante »)

Contre la PU:

  • elle tache le papier (du moins la mienne qui est jaunatre), alors que la PVA est bien blanche
  • elle met très longtemps à sécher, même appliquée en couche fine (la PVA en couche fine sèche quasiment instantanément)
  • elle reste liquide plus longtemps que la PVA, et donc si on en applique une couche épaisse (ce que je fais sur les reliures pour remplir les trous) elle coule facilement et colle le livre à la presse.
  • elle ne se nettoie pas à l'eau mais à l'acétone

L'usage dira si la reliure à la PU tien mieux les pages que celle à la PVA. Wikipedia en Anglais mentionne que l'industrie du livre utilise de la colle à base de PU depuis quelques années.

[ Posté le 27 août 2008 à 23:55 | 4 commentaires | ]

Caylus – La guilde des voleurs

Catégories : [ Bricolage | Jeux ]

caylus_guild_of_thieves

Dan Rosewater a crée un nouveau bâtiment pour Caylus intitulé la guilde des voleurs, qui a cela de particulier qu'elle coûte des points à construire, mais permet de voler une ressource ou un denier (selon la version utilisée) à un des adversaires.

Seulement voila, les images sont disponibles seulement en faible résolution, et en plus il a utilisé la carte « Résidence » sans enlever le texte du fond de la carte. Alors je me suis dit que je peux faire mieux, et voila : les deux versions en 300 DPI et avec le texte approprié en filigrane.

Voici aussi une version en pdf imprimable immédiatement à la bonne taille, ainsi que le fichier original au format natif de Gimp (xcf).

[ Posté le 27 août 2008 à 23:55 | pas de commentaire | ]

Dice Tower Pieces

Traduction: [ Google | Babelfish ]

Catégories : [ Bricolage | Jeux ]

Dice_Tower_Pieces

Thanks to Reijo and Antti, I managed to get all the pieces for my dice tower cut out of wood. After sanding, glueing and again sanding, its core should be ready. Then I'll just need to add a cover and a tray. The assembly is not trivial, because the side angles of the pieces are not exactly 90°, Antti's plane is a bit crooked since he dropped it :(

Below are pictures of the pieces put together as they need to be glued later.

Dice_Tower_together_1 Dice_Tower_together_2 Dice_Tower_together_3 Dice_Tower_together_4 Dice_Tower_together_5

[ Posté le 27 août 2008 à 23:54 | pas de commentaire | ]

Polyurethane Foam 2

Traduction: [ Google | Babelfish ]

Catégories : [ Bricolage ]

Polyurethane_foam_mushroom_refilled

I added more foam into the mushroom's cavity, but even after over 24 hours, it did not dry completely inside. Moreover, the connection between the old foam and the new foam is not very clean, and the inside of the foam is very brittle. This experiment was not really a success.

Polyurethane_foam_panel

I also tried to make a flat “panel” of foam of about 5cm thick, but the top surface is not even nearly flat, full of holes, but the inside dried almost completely. I don't know how it would react if I add more foam on top of it. Will it fill the gaps? I have to clean the nozzle of the bottle first, it's completely stuck with hard foam. Acetone seems to dissolve the foam though, which helps a lot. I just hope it doesn't produce lethal gases or something…

[ Posté le 27 août 2008 à 23:54 | pas de commentaire | ]

Mercredi, 18 juin 2008

Postipaketin saapumisilmoitus

Traduction: [ Google ]

Catégories : [ Bricolage ]

Saapumisilmoitus

Postineidit eivät tykkää kun tulen hakemaan postipakettiani, koska en yleensä jaksa odottaa postimiehen postilaatikkoon livauttamaa saapumisilmoitusta. Tulostan lähetysseurannan sivun netistä, ja menen suoraan postiin. Mutta seurantanumero tulostuu niin pienillä kirjaimilla että se on postineitille vaikea lukea. Miten voisin tehdä lopun postineidin kidutuksesta?

Hyvä uutinen on, että saapumisilmoituksessa on viivakoodi, joka on Code 128-muotoinen. Ja LaTeXilla on code128.sty paketti (tiedoston nimi on oikeasti code128.tex mutta se toimii samalla tavalla jos nimetään se uudelleen .sty-ksi.) Ratkaisu on itsestään selvä: kirjoitan LaTeXilla oman saapumisilmoituslapun. Tässä on viivakoodin esimerkkikoodi:

\documentclass[a4paper]{article}
\usepackage{code128}
\begin{document}
\X=.48mm
\bcorr=-.08mm
\hfill\codetext{JJFI65432101234567890}
\end{document}

Niin helppoa se on. Tein kaupan päälle dokumentin, joka on lähes samannäköinen kuin virallinen saapumisilmoituslappu (eli siinä on viivakoodi, lähettäjä, vastaanottaja ja tila allekirjoitusta varten, mutta kaikki muut tekstit puuttuvat). Toin sen hämmästyneen näköiselle postineidille; viivakoodin lukeminen onnistui, sitten hän pyysi minua kuittaamaan sen, ja antoi minulle pakettini. C'est passé comme une lettre à la poste.

Tarinan opetus: LaTeX helpottaa suhteita postineitien kanssa.

[ Posté le 18 juin 2008 à 15:11 | pas de commentaire | ]

Mardi, 18 mars 2008

Are Your Card Sleeves Too Wide?

Traduction: [ Google | Babelfish ]

Catégories : [ Bricolage ]

I bought a pack of 25/8 x 35/8 card sleeves to protect my Citadels character cards, but they are of course too wide (they are meant for Magic The Gathering cards). The guy at the shop suggested I could melt the side with a lighter, but he meant it as a joke (I hope). But what actually works (I just tried) is a soldering iron.

The sleeves are made of polypropylene, which melts at about 170 °C, but doesn't burn before 570 °C, so it's quite safe if you have an adjustable temperature soldering iron. I tried to tracing a line slowly on the sleeve along a piece of PCB board (because it's a heat insulator, I wouldn't have tried this with a plastic or aluminium ruler), and it made a nice seal. I suppose that cutting along the seam with a hobby knife would remove the excess plastic without destroying the sleeve.

Next step, mass production (that is, 9 sleeves for the basic characters, and 10 more for the extended characters).

[ Posté le 18 mars 2008 à 10:11 | pas de commentaire | ]

Mercredi, 23 janvier 2008

Format des cartes à jouer

Catégories : [ Bricolage ]

Pas de format standard, j'ai trouvé des cartes en largeur 55-57 mm et d'autres en largeur 63 mm. La hauteur est 84-89 mm.

En formats ISO approchants, on a:

  • A8 = 52 x 74 mm
  • C8 = 57 x 81 mm
  • B8 = 62 x 88 mm

Le B8 à l'air sympathique, mais d'ici à trouver une imprimante qui accepte du format B…

[ Posté le 23 janvier 2008 à 00:04 | pas de commentaire | ]

Samedi, 13 octobre 2007

UV LED Lamp

Catégories : [ Bricolage ]

UV_Lamp_1

I bought some time ago Die Nacht der Magier, which is a board game with phosphorescent pieces, played in the dark. I read on the Web (therefore it has to be true) that phosporescent paint is getting “recharged” much faster with UV light than with white light. So I had to build a UV lamp. I bought UV LEDs at LSDiodes.com, and I finally built the device.

It has 10 LEDs, connected in parallel two by two with an 18 Ω resistor for each pair of LEDs, and is powered with a 4.5 V alkaline battery. Each diode is supposed to draw 20 mA and to have a forward voltage of 3.6 V, while the battery, providing 200 mA, sees its voltage drop to 4.3 V. In practice, it seems that the battery is not always able to do so, and during the first test after building the lamp, it provided only 80 mA. Another time, it was 130 mA.

UV_Lamp_2

UV do recharge the phosphorescent paint quicklier than while light. Also, I discovered that teeth are fluorescent, as well as soap (but not fluor toothpaste), white paper, many colored plastics in children's toys and white cloths (including those which have been washed with washing powder supposed not to contain optical brighteners). Also, the UV lamp allows to see the pattern of the mattress through the bedsheet. UV light is lots of fun.

[ Posté le 13 octobre 2007 à 22:53 | pas de commentaire | ]

Dimanche, 7 octobre 2007

Dice Tower Glued

Traduction: [ Google | Babelfish ]

Catégories : [ Bricolage ]

After a lot of sanding, I finally glued the pieces together, and it's not even very much crooked. Sanding surfaces so that they are flat enough to be glued is not an easy task, but thanks to two new techniques I invented (or rediscovered), it was a bit easier. I first tried cocoametry, where you brush cocoa on the surface, then scrape it with a straight tool, and look at the mess: where all the cocoa has been scraped there is a hill, and where there is still cocoa, there is a valley. You just need to sand the hills a bit more. The second technique is pencilometry, where you apply with a pencil a lot of graphite on both surfaces you want to glue, and then thrust the two surfaces together. Where the graphite concentrates, there are hills that you need to sand.

dice_tower_assembled_1 dice_tower_assembled_2 dice_tower_assembled_3 dice_tower_assembled_4 dice_tower_assembled_5

Now I “just” need to put some wall around the core. Either cardboard (but that's going to be ugly I think) or transparent plastic (but much less easy to work with).

[ Posté le 7 octobre 2007 à 11:20 | 1 commentaire | ]

Dimanche, 2 septembre 2007

Polyurethane Foam

Traduction: [ Google | Babelfish ]

Catégories : [ Bricolage ]

Polyurethane_foam_mushroom

I tried to make a block (12x12 cm) of polyurethane foam with a cardboard shape, but what I got was this mushroom full of air and wet on the inside. Moreover, it leaked during the night, so some amount of the PU inside came out, increasing the size of the inner cavity. I'll let it dry a bit before throwing it away, but I'll have to find another way to make my blocks of foam. Maybe making a 6x6 shape out of wook? Note to self: don't fill the shape up to the rim, the foam expands about twofold. Less foam would dry quicklier.

[ Posté le 2 septembre 2007 à 09:23 | 3 commentaires | ]

Samedi, 1er septembre 2007

Dice Tower, Part 1

Traduction: [ Google | Babelfish ]

Catégories : [ Bricolage | Jeux ]

Dice_tower_3D_plan

I've decided to build a dice tower. Not the same as everybody else is building (not that it's not good, I'm just being posh there), but a tower where the dice roll in every direction, instead of in only one vertical plan. Drawing the plan took two evenings and a bit of a headache for the middle part, but it's done and the plan looks correct. The core is going to be 36cm tall with a 12x12cm base.

For the building, I've decided to carve it out of polyurethane foam. I've bought a can of liquid PU foam, and I'll have to make three cubes out of it. I'll use a cardboard box as a form, and carve the cubes with saw and knife. The I'll glue the cubes together and add side walls and a tray at the bottom for the dice to roll into when coming out of the tower.

[ Posté le 1er septembre 2007 à 17:10 | 4 commentaires | ]

Vendredi, 17 août 2007

Extensions pour Carcassonne faites-maison

Catégories : [ Bricolage | Jeux ]

La boite de base de Carcassonne coûte 20 Euros, ce qui est raisonnable. Les extensions, en revanche, coûtent 15 Euros chacunes, ce qui rapporté au nombre de pièces qu'elles comportent, coûte le double du jeu de base. J'ai décidé que le prix était abusif, et que je fabriquerai ces extensions moi-même.

Les cartes étaient faciles à fabriquer, il suffit d'imprimer des scans des cartes (obtenus sur BoardGameGeek, il y a des gens assez fondus pour scanner les planches de cartes avant de les découper ! Mais ça m'a grandement facilité la tâche), puis de les coller sur du carton de 2mm d'épaisseur à la colle blanche étalée finement avec une spatule large, puis de couper au cutter. On refait de même pour le dos.

Carcassonne_DIY_meeples2

Les petits pions, en revanche sont moins évidents à fabriquer. J'ai emprunté des exemplaires à un ami qui possède la plupart des extensions, je les ai scanné et obtenu des silhouettes que j'ai ensuite collées sur une baguette de bois de 10 mm d'épaisseur, puis découpé à la scie à chantourner électrique (munie d'une lame torsadée, c'est plus facile qu'avec une lame droite) et poncés.

Ensuite, je les ai peints avec une sous-couche de lasure incolore, deux couches de peinture, puis à nouveau une couche de lasure. Les bleus, verts et le comte en mauve sont peints à la gouache, parce que je n'avais pas les bonnes couleurs en acrylique. Ce fut laborieux car la gouache se redissout dans l'eau même une fois sèche (ce qui n'est pas le cas de l'acrylique), je les ai donc recovertes d'un vernis spécial gouache (mais même l'eau du vernis abimait parfois la couche de gouache. Une horreur.) Les pions pour le sixième joueur sont simplement lasurés avec de l'incolore, ce que je trouve nettement plus beau que l'ignoble gris de l'extension officielle.

Carcassonne_box_top

Restait ensuite à ranger le tout, de préférence dans la boite du jeu de base, qui est essentiellement pleine de vide. Après de nombreuses heures de cogitation, je me suis rendu compte qu'il n'y avait pas assez de place dans la boite pour ranger les cartes dans de petits compartiments qui seraient assez long pour qu'on puisse y glisser les doigts et saisir les cartes. Si je voulais les faire tenir toutes dans la boite et en plus y placer tous les pions, je devais les ranger le plus serré possible.

Carcassonne_box_top_side Carcassonne_all_miniboxes

La seule solution alors pour pouvoir sortir les cartes d'une extension sans difficulté était de placer les cartes de chaque extension dans de petites boites individuelles, faciles à saisir et sortir de la boite.

Il m'a fallu un épisode de Monk et deux épisodes de Murder, She Wrote pour compléter un premier prototype, constité essentiellement de ruban adhésif tellement j'avais plié, coupé, recollé, recoupé et rerecollé.

Les boites portent sur le dessus du couvercle le nom de l'extension (ou des extensions) qu'elles contiennent, et sur l'avant du couvercle le logo Carcassonne. Le fond des boites à l'intérieur portent le nombre de cartes qui doivent y être rangées. Selon la largeur de la boite, le texte et le logo ont été tournés de 90°. Le texte est écrit dans une fonte appelée Lindsay. Comme je ne voulais pas dépenser 30 Euros pour acheter la fonte, j'ai utilisé la possibilité du site MyFont.com d'obtenir des échantillons de n'importe quelle fonte en bitmap. J'ai vectorisé les bitmaps, et j'ai pu ainsi obtenir le texte que je voulais après assemblage.

Carcassonne_minibox1_closed Carcassonne_minibox1_open Carcassonne_minibox2_closed

Carcassonne_box_empty

Enfin j'ai scanné l'image qui se trouve au dos du plateau de décompte des points et je l'ai imprimée en plus grand sur trois feuilles A4. J'ai découpé dans du carton de 0.75 mm la forme de l'insert qu'il me fallait, puis j'ai collé à la colle en spray les trois feuilles A4 préalablement ajustées.

[ Posté le 17 août 2007 à 22:59 | 8 commentaires | ]

Jeudi, 16 août 2007

Batteur de cartes en LEGO

Catégories : [ Bricolage ]

L'envie m'a prise de construire une machine à battre les cartes en LEGO. Dont acte, voici la bête. Le principe est très simple : des roues en caoutchouc entrainent la carte du dessous d'un paquet et l'envoie à travers une fente. Ce mécanisme est reproduit deux fois, et les cartes de deux demi-paquets sont envoyées au hasard vers un emplacement central.

Batteur_de_cartes_2 Batteur_de_cartes_1 Batteur_de_cartes_5

Batteur_de_cartes_3

Détail du mécanisme d'entraînement. La grande roue dentée sert de manivelle. On voir aussi une roue en caoutchouc.

Batteur_de_cartes_4

Une des difficultés a été d'empêcher les cartes de se placer de travers lorsqu'elles sont entraînées. Les barres verticales les maintiennent en position et sont ajustables à la largeur du jeu de carte.

Batteur_de_cartes_6

Le mecanisme en action : on voit une carte passer à travers la fente. Pour plus de clarité, seul le coté droit contient des cartes.

C'était sympa à bricoler, mais un vrai casse-tête à faire fonctionner correctement. D'ailleurs, ça ne fonctionne pas correctement, trop souvent une carte passe à travers la fente d'en face et les cartes se bloquent ; ou encore une carte se pose de travers et empêche les suivantes de s'empiler correctement.

[ Posté le 16 août 2007 à 21:36 | 2 commentaires | ]

Samedi, 4 août 2007

Reading Lamp

Traduction: [ Google | Babelfish ]

Catégories : [ Bricolage ]

Lampe-originale

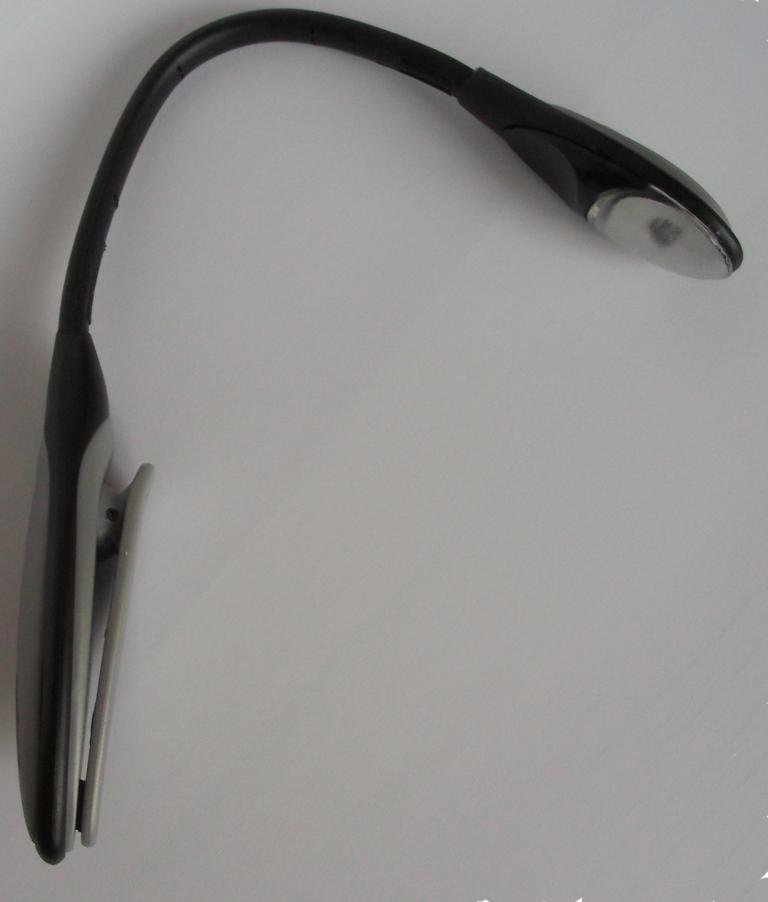
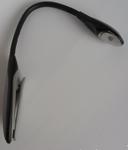
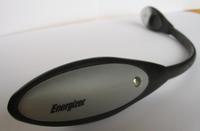
Last Christmas, I got a LED-based lamp that you can clip onto a book for reading in dark places, e.g., in bed without lighting the whole room. It's very handy, lightweight and it lights both pages of a book very well. It would be perfect if it didn't require Lithium batteries (CR2032, button-shaped batteries, 20 mm diameter and 3.2 mm thick). These batteries are expensive if bought in small amounts, and they need to be replaced often compared to e.g., AAA batteries (at least in theory).

Lampe-modifiee

So I decided to fit AAA batteries onto it. The original lamp's design is very simple: two 3V batteries in series, one white LED, a switch and that's it. No fancy electroncics, no black magick: you can't make it any simpler. So replacing the Lithium batteries with alkalines is very simple in theory: fit a holder for 3 AAA alkaline batteries, add a 33 ohms resitor in series, connect the wires to the contacts, and Bob's your uncle. In practice, it was a bit more difficult, but not much.

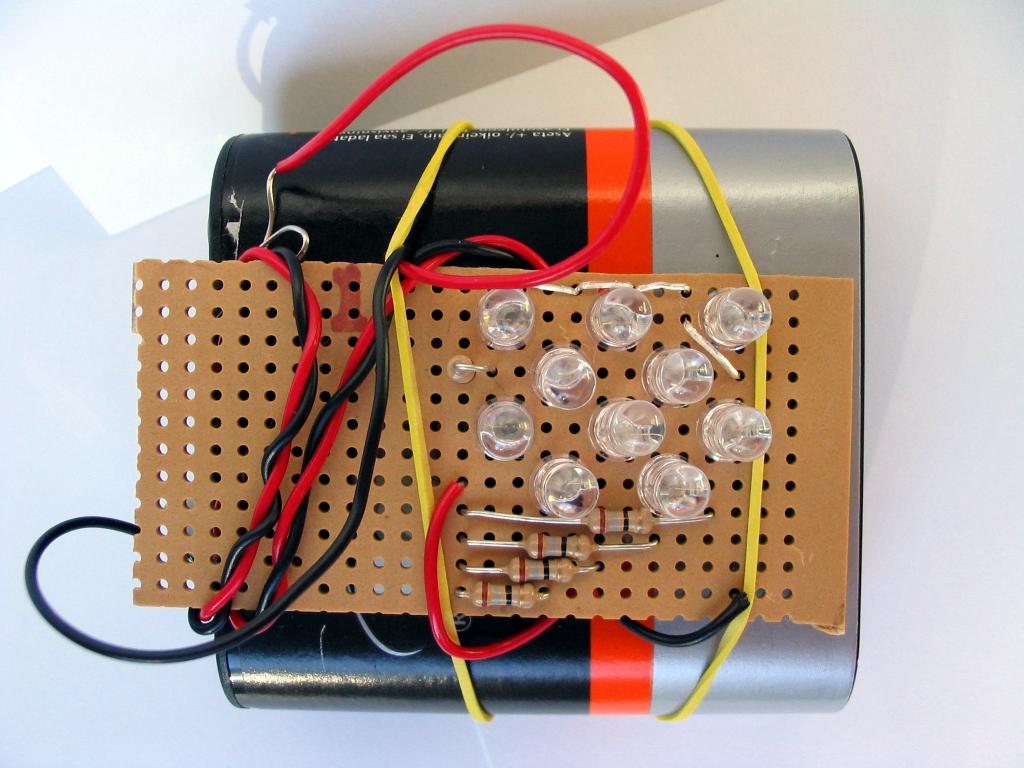
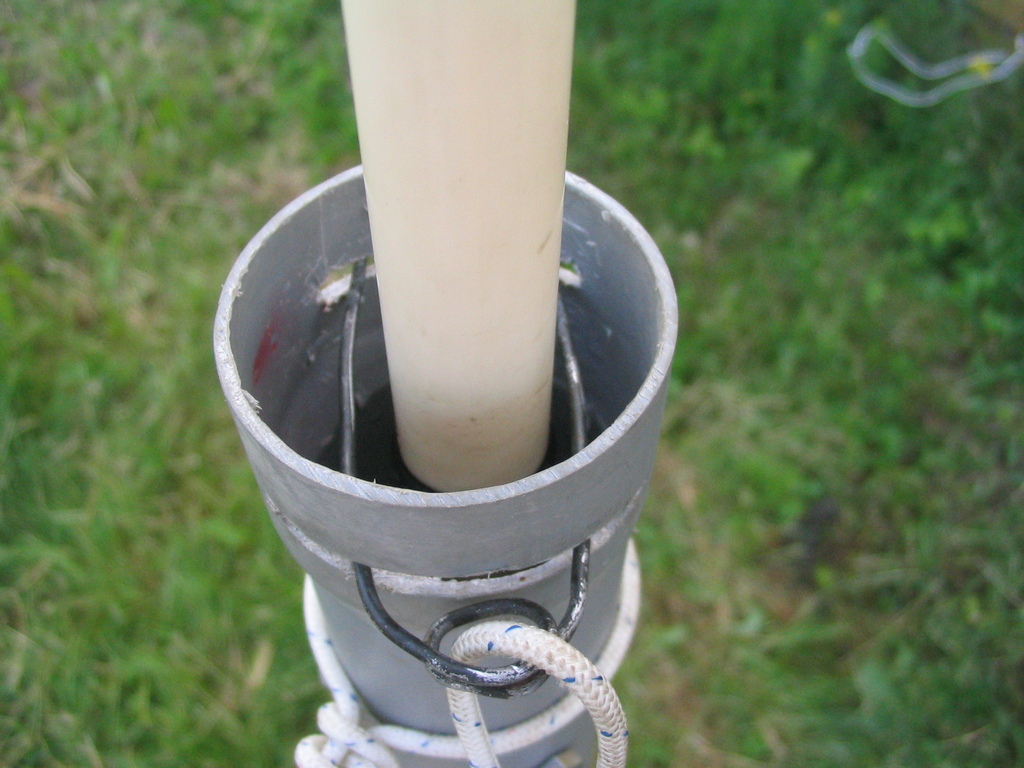
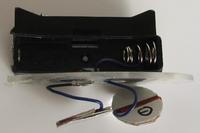
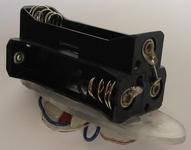
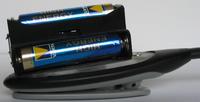
3-AAA Battery Holder

The electronics shop I went to didn't have any 3-AAA holders, only 1 piece or 4 pieces holders. So I went for three times one and I glued them together with cyanoacrylate glue, after sanding the surfaces to ensure that they were perfectly flat.

Lampe-boitier_droite Lampe-boitier_dessus Lampe-boitier_gauche

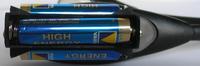
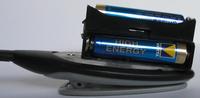
Then, I needed to connect the three batteries in series. This has been done with the legs of the resistor.

Lampe-piles-boitier_contacts_avant Lampe-piles-boitier_contacts_arriere

I added two wires from the remaining connectors and routed them through the ready-made holes in the holders. To one of the wires, I soldered the resistor. It rests in the angle of the battery holder: since the holder is square, and the battery is round, there is some space left along the sides, enough for a wire or even a resistor. I used insulation tape to prevent contact between the soldered resistor and the battery.

Lid Replacement

Lampe-originale_boitier

The original lid for the battery compartment is nicely round and everything, but this makes it impractical to glue anything onto. I therefore decided to make my own replacement for this part, which would be flat (and probably 
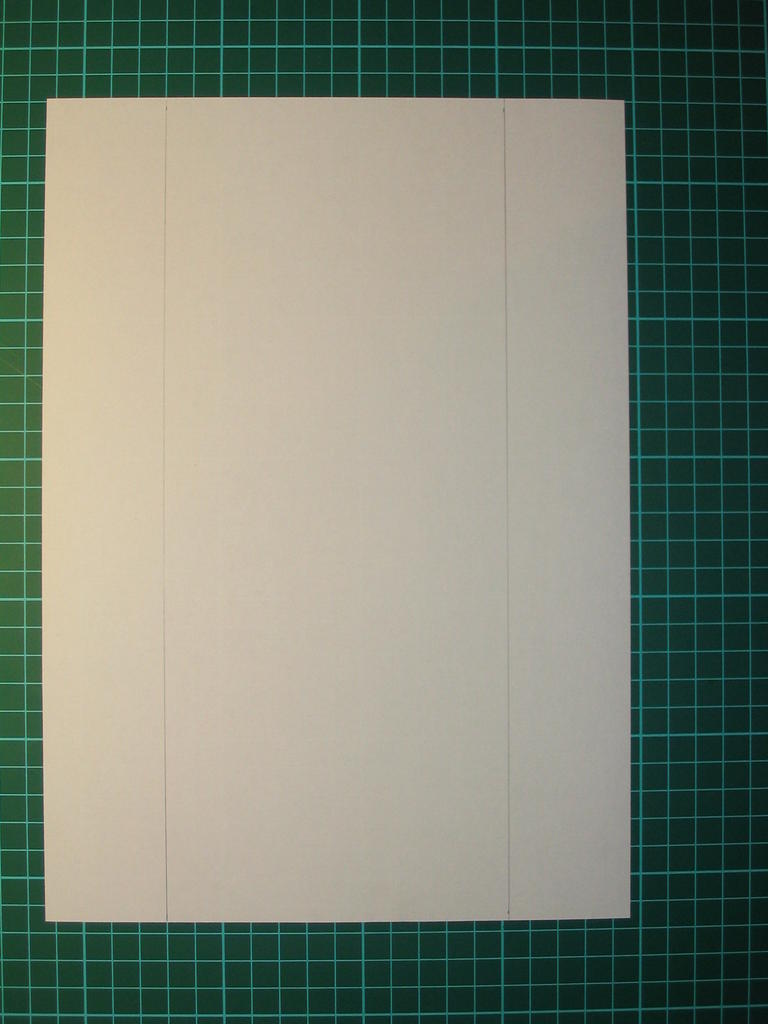
ugly). I got a piece of Plexiglas (PMMA, or acrylic glass) from a friend, and 
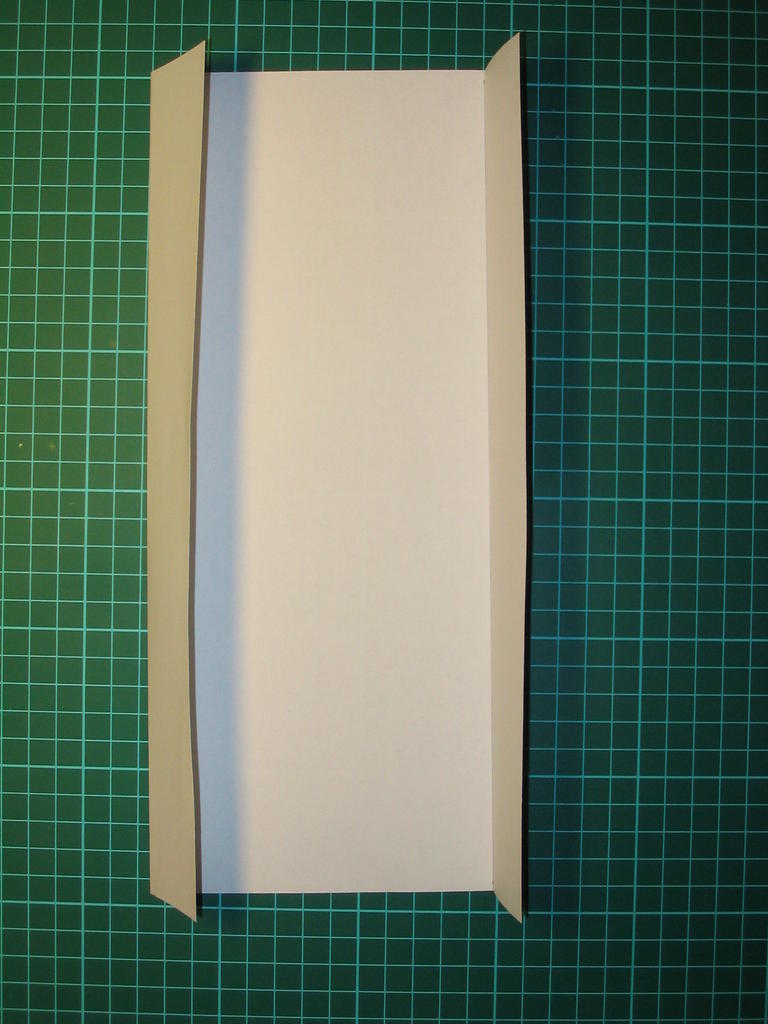
cut a piece of more or less the right shape. The fitting was actually quite difficult, because the battery compartment has several screws and bits that are protruding slightly. It required a lot of sanding before getting a good enough fit. Plexiglas can be bent slightly, but if the back of the support wouldn't be flat, the battery holder could not be glued anymore with cyanoacrylate (which requires perfectly matching surfaces for bonding). Thank $DEITY for powertools!

Lampe-boitier_interieur

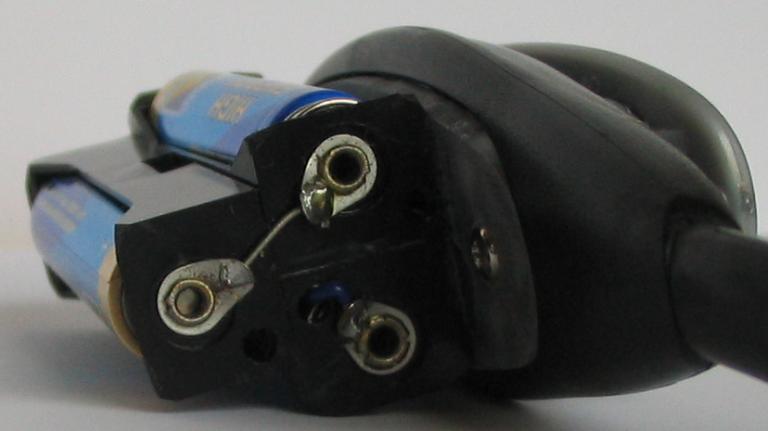
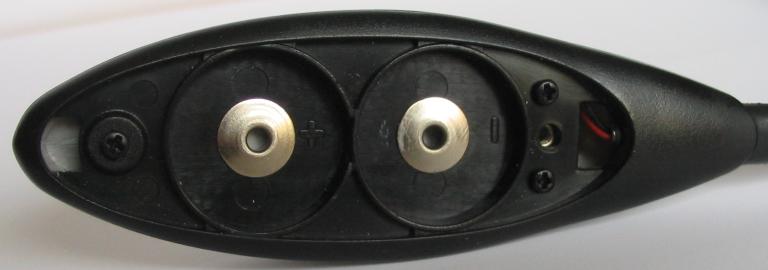
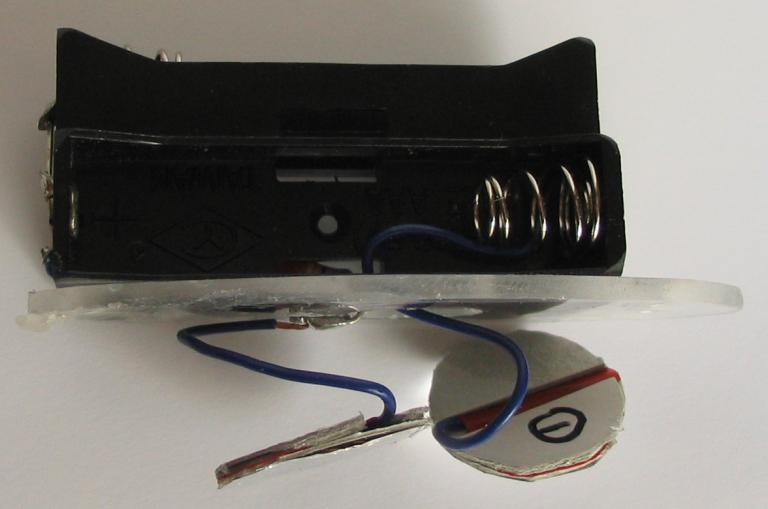
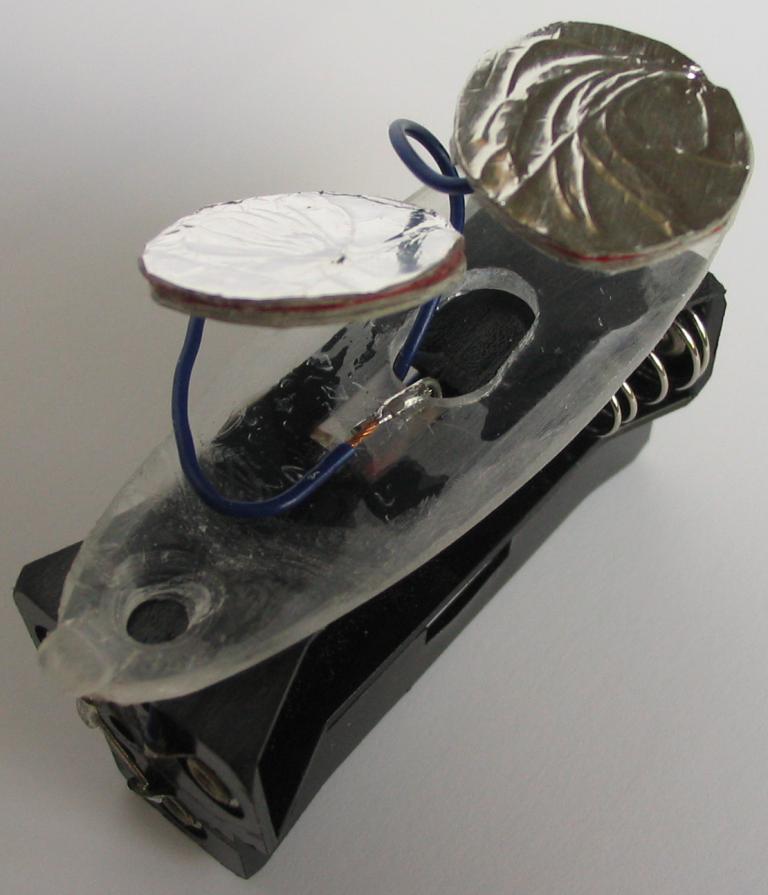
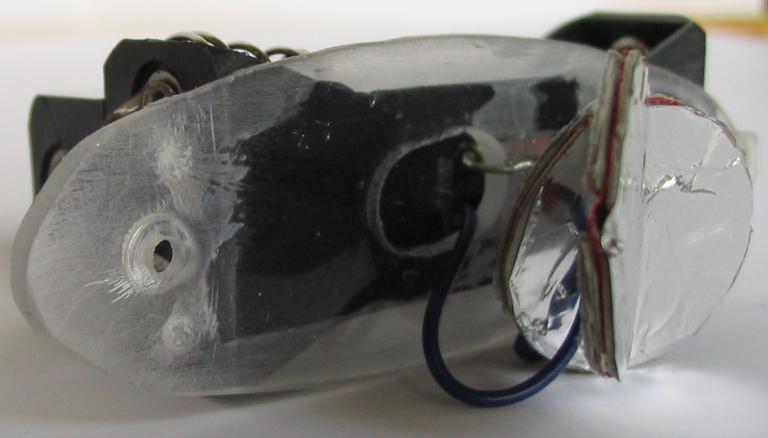
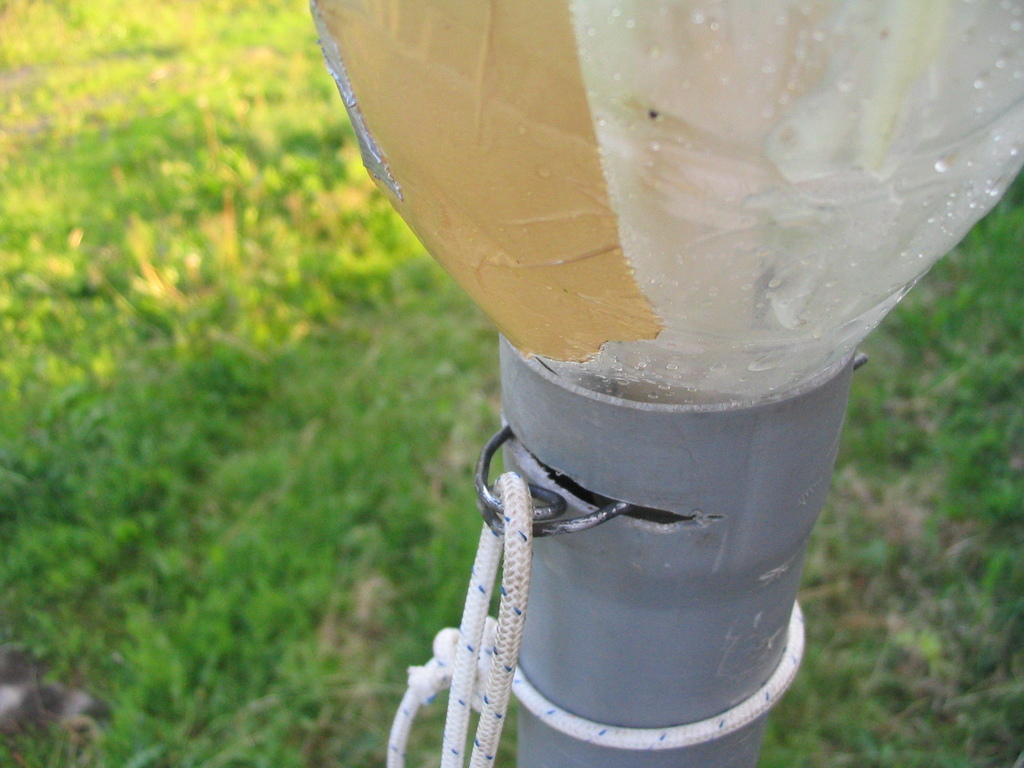
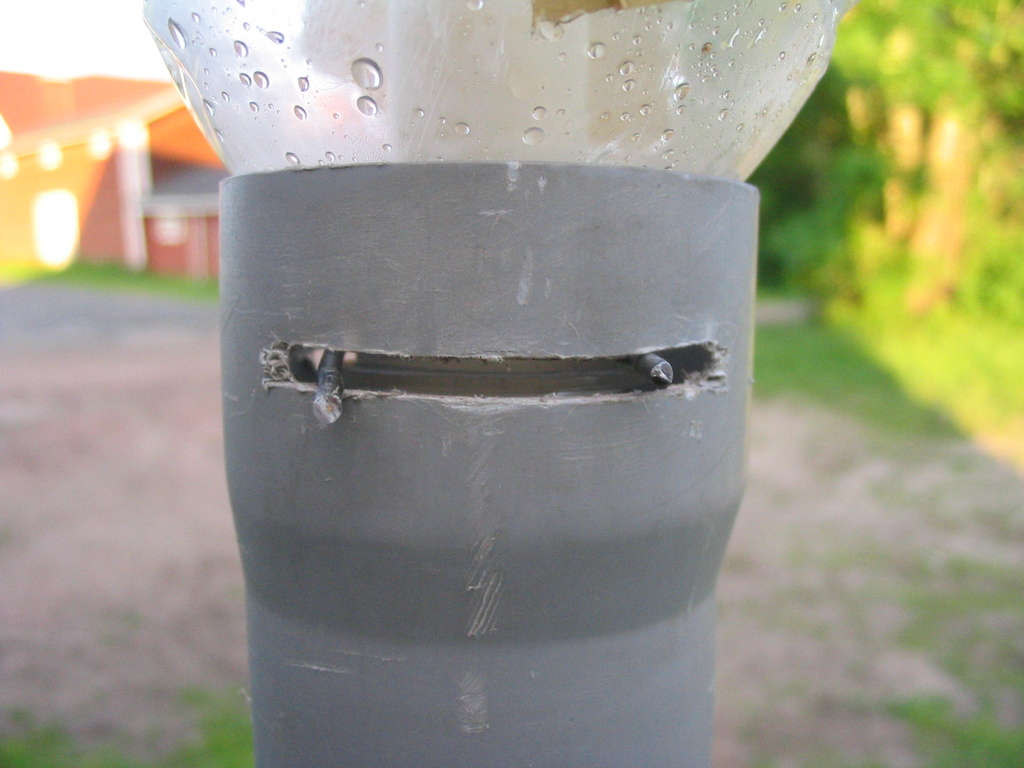
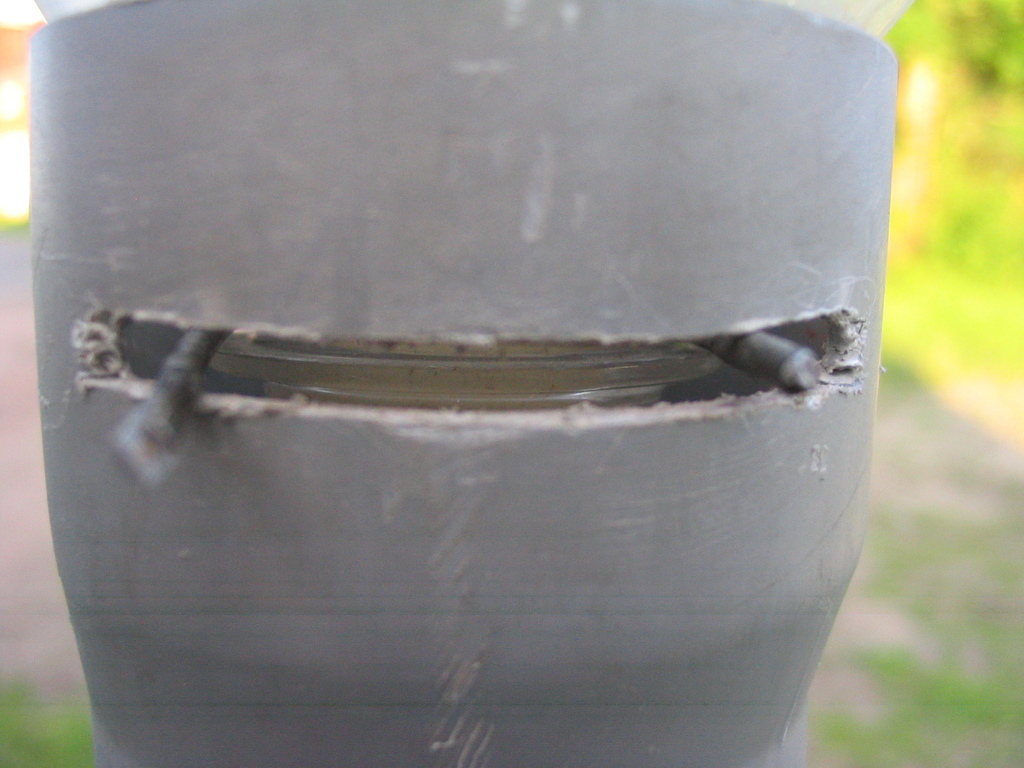
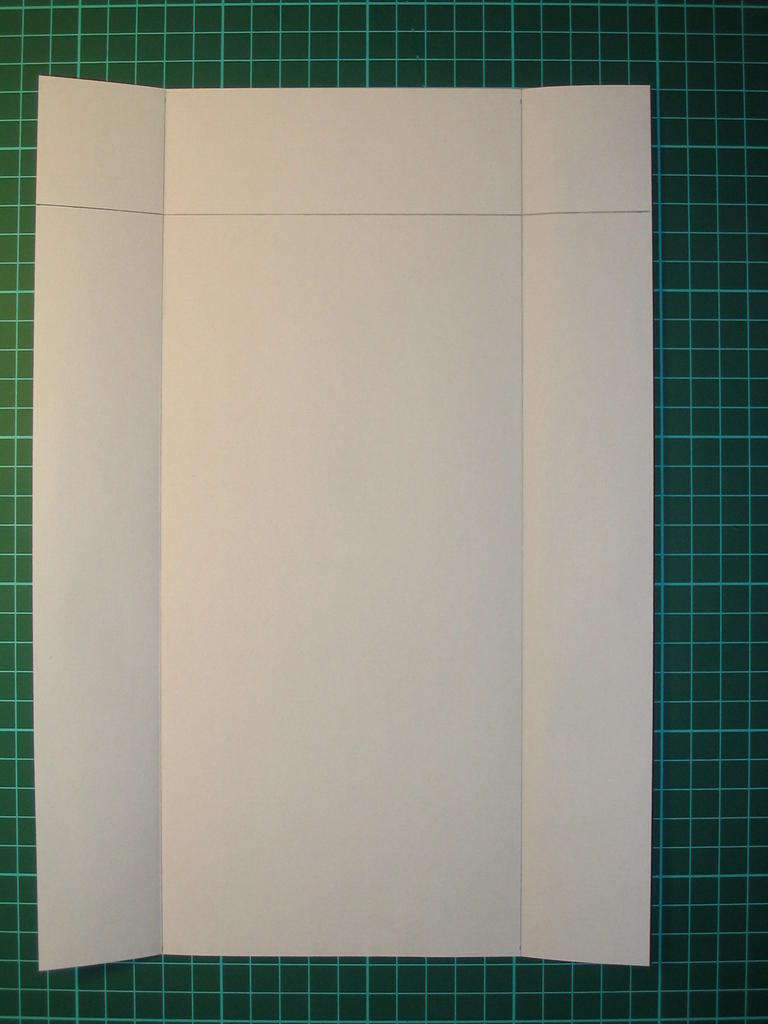
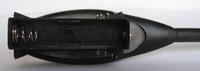
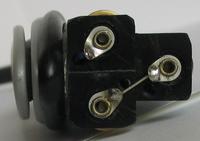
This is the inside of the battery compartment. It has one screw on the left, two protruding rings holding the original CR2032 batteries, and two more screws on the right. Moreover, it has a slot in the far left where the lid's 
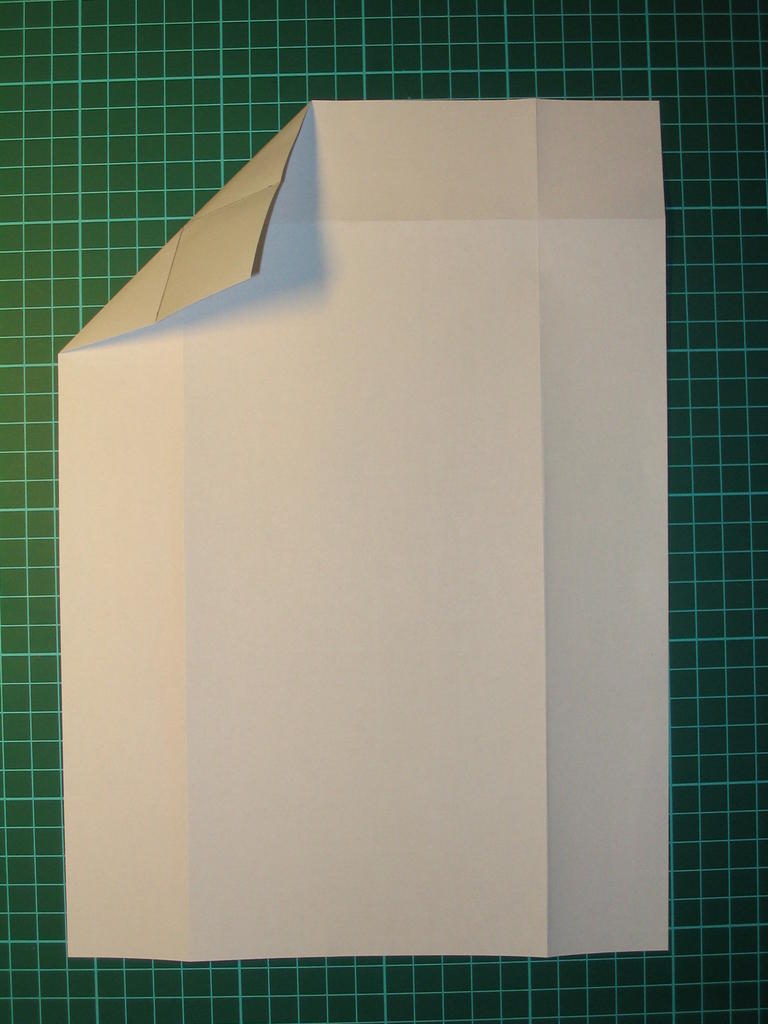
tail bit goes. The next picture shows this tail bit, on the far left of the support piece.

Lampe-boitier+support_profil_droit

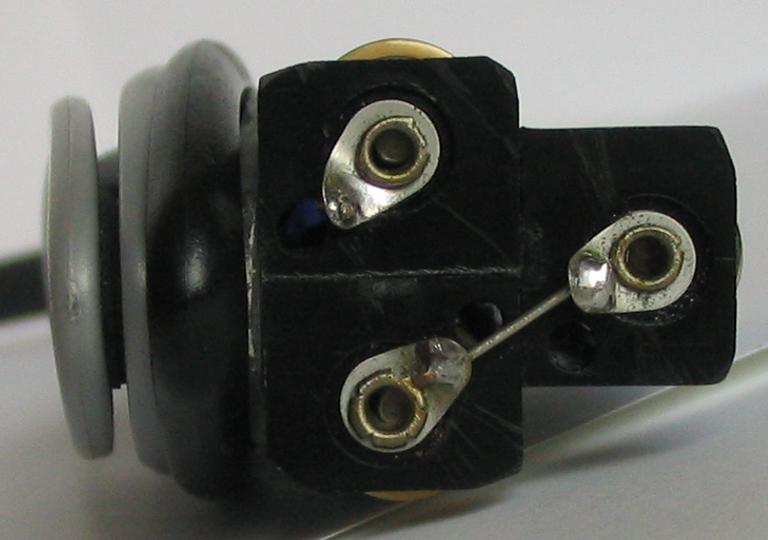
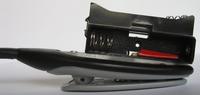
The tail bit is made of a piece of the same plexiglas sheet as the support. I glued it in the right place with cyanoacrylate, and then I sanded it until it was thin, short and narrow enough to fit into the slot. The two next pictures show more of the sanding that was needed in order for the lid to fit on top of the screws and other bits. The first picture shows the tail bit again on the left, as well as a hole for the screw located next to the slot. The second picture shows the hole through which the fixation screw goes, as well as the places where the two other screws go. On both pictures, you can see the central hole where the wires go through to the contacts in the lamp's original battery compartment.

Lampe-support_languette Lampe-support_trou

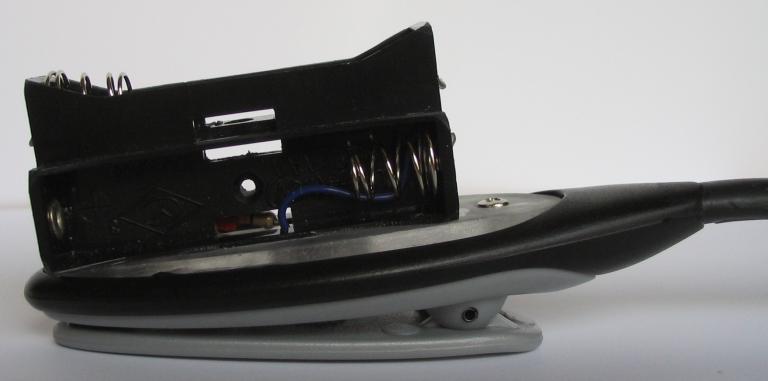
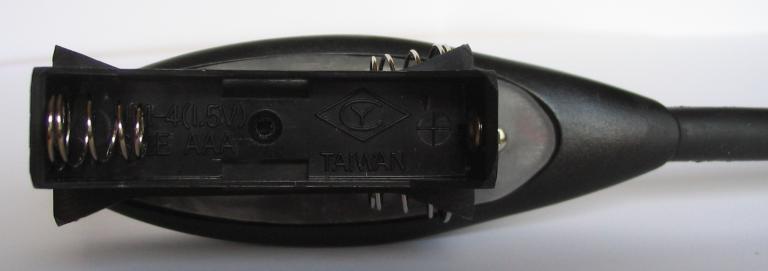
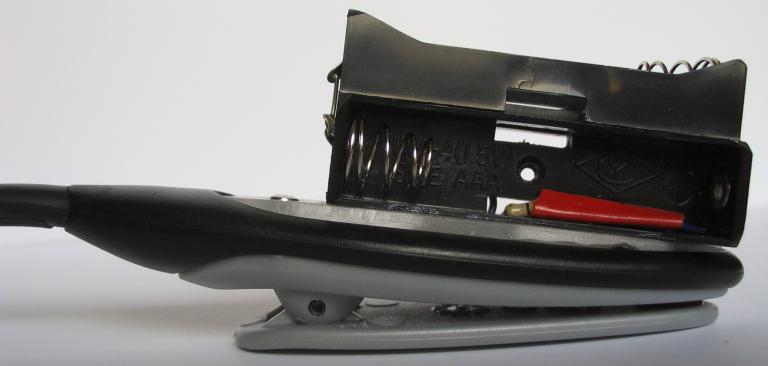
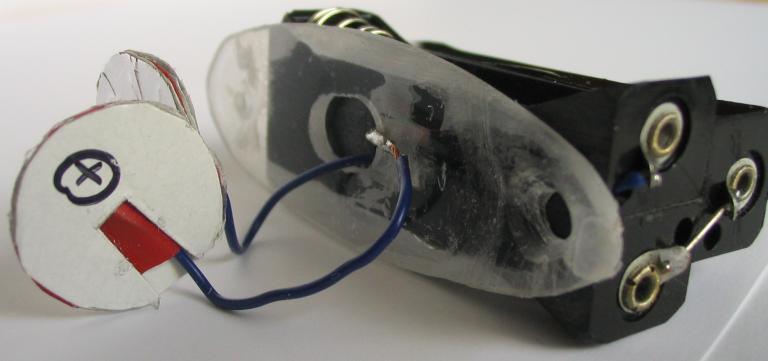
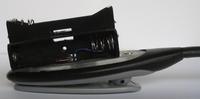
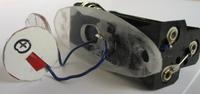
The next two pictures show the whole device I built, including the contacts, from two more angles. You can see the resistor wrapped in red insulation tape.
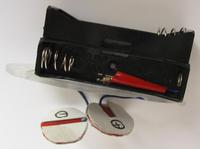
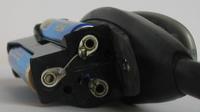
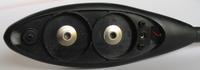
Lampe-boitier+support_avant Lampe-boitier+support_profil_gauche

Contacts

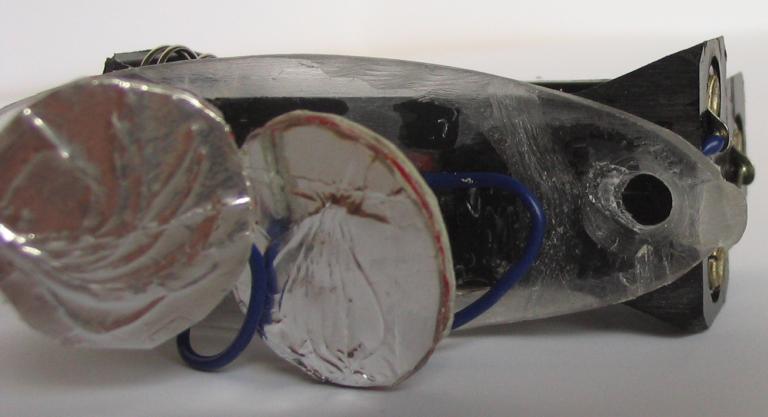
My first idea was to use two 10 eurocents coins as contacts, since they have almost exactly the same diameter (19.75 mm) as the original batteries (20 mm) while being a bit thinner, which would have allowed to add the wires or some kind of foam adding pressure and maintaining the electrical contact. It was a bad idea: soldering onto the coins is difficult, because the coin acts like a heat sink for the soldering iron and the tin, instead of reaching the right temperature that would allow to make a proper solder. Well, it's not that bad: the device is 0.20 EUR cheaper this way.

Instead, I used aluminium folio, cardboard and double-sided tape to build round contacts that fit into the battery holes, as shown on the three next pictures.

Lampe-contacts Lampe-contacts_dessous Lampe-piles-boitier+support

Integration

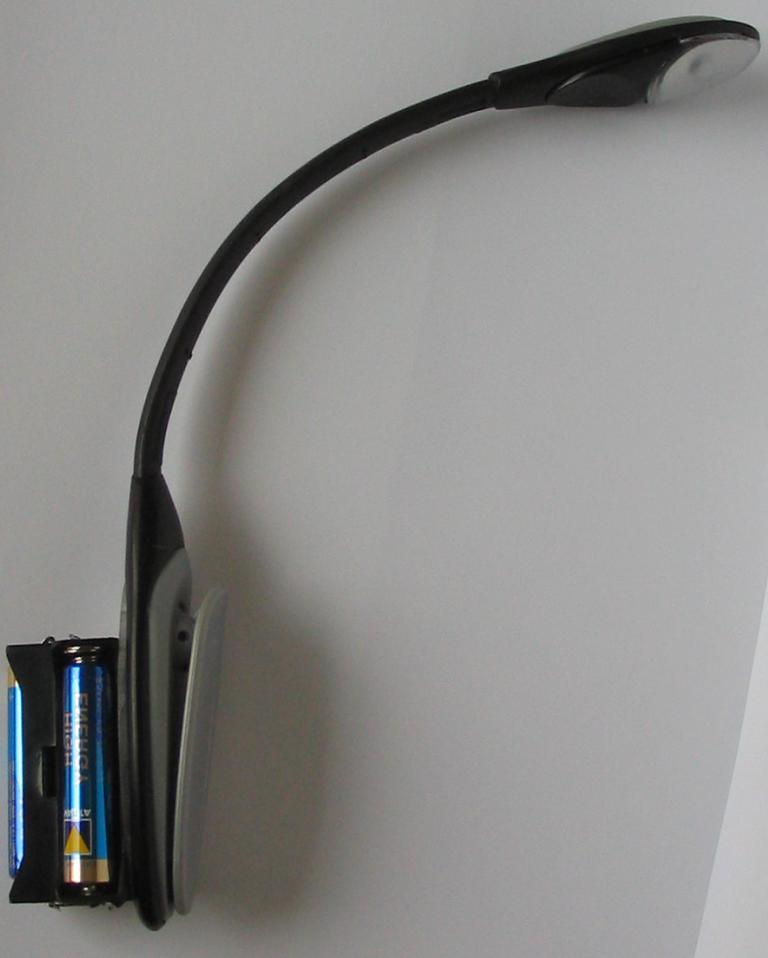
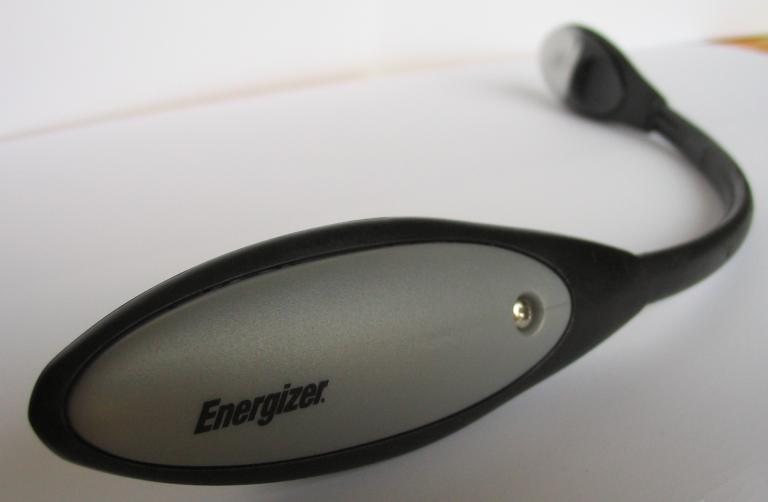
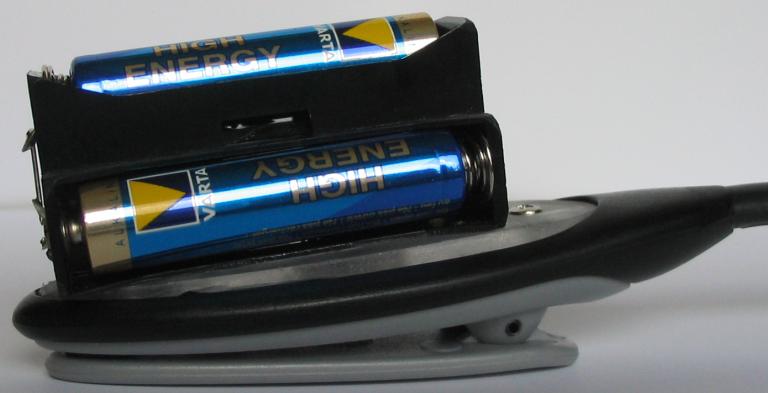
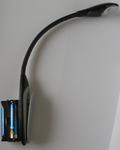
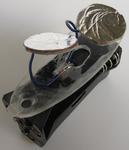
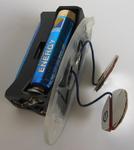
Finally, here's the device with its batteries, mounted onto the lamp:

Lampe-piles-droite Lampe-piles-dessus Lampe-piles-gauche

It looks quite “hacker-techno-raw” (or whatever you want to call it), but it works. It's of course heavier than the original lamp, but the clamp is strong enough to hold even on a paperback. The only drawback is that the angles are still quite sharp, and the battery pack hurts the skin when it lies on your lap.

Electricity Consumption

The 3 AAA batteries give 4.6 V without a load (i.e., when the lamp is off) and 4.5 when it's on. The voltage across the 33 R resistor is 0.7 V, which gives a 21 mA current and 3.8 V across the LED, which look like the nominal values one can find on the Web. The LED therefore consumes 80 mW and 15 mW are wasted in the resistor and the batteries' internal resistance (that's about 16%).

[ Posté le 4 août 2007 à 16:00 | pas de commentaire | ]

Lundi, 2 juillet 2007

Water Rocket Theory

Traduction: [ Google | Babelfish ]

Catégories : [ Bricolage | Science ]

The physics involved in flying a water rocket is not very complex if you have studied a little bit of mechanics and fluid mechanics. It is summarized in a PDF file written by Peter Nielsen, Associate Professor in Civil Engineering of the University of Queensland, Australia. I wrote a Perl script that implements the formulas and outputs data plotable with Gnuplot.

water_rocket_theory

I just finished fixing a bug in the script which was promising wonderful performance of my rocket (like over 200 m altitude and a maximum speed of over 350 km/h), but which were never reached by our rocket. The water rocket that we built last week-end is in theory able to reach 38 m after 2.7 s of flight. Its top speed is 35.5 m/s (126 km/h) after 0.33 s of acceleration, and the acceleration increases from 95 to 169 m/s2 within the same time.

After that, it decelerates during a bit over two seconds, and then starts to drop back to the ground, and lands about 5.8 s after take off (omitting the effect of the parachute).

water_rocket_theory_2

Tuning the parameters of the script, I found the following optimal values: the weight of the rocket should be 140 g, the filling ratio of the water tank should be 0.38 with a pressure of 7 bar, and 0.45 with a pressure of 5 bar. Because of former erroneous calculations, I thought that the optimal filling ratio was about 0.60, which lead to much poorer performance, due to the overload. This second graph shows the theoretical height, speed and acceleration of the rocket during its last flight. The water empties in about 0.32 s, which corresponds to what has been seen on the video clip, and the maximum height is 36.8 m, which seems reasonable (although it has probably never been reached because the parachute opened far too early).

The drag coefficient is one parameter that is very difficult to estimate, and for now its value is 0.9 for the calculations, which is barely better than the one of a brick (about 1.1). Its real value may be less. Or more. Who knows…

Also, the leaks in the pressuring system make it difficult to estimate what was the actual pressure in the rocket at take off. And water was poured without real accuracy, so the above filling ratio may as well be 0.8 or 0.5.

[ Posté le 2 juillet 2007 à 17:06 | pas de commentaire | ]

Water Rockets 2

Traduction: [ Google | Babelfish ]

Catégories : [ Bricolage ]

Reijo and Juha have been busy last week building another rocket using old CDs as fins and also building a new launching pad out of metal tubes. Here are the pictures.

CD_Rocket

Sikaflex has again been used to glue the fins to the bottle.

This launchpad is made of metal tubes and doesn't leak anymore. Moreover, it is orientable and mounted on a stand (on the contrary to the old one which was attached to a pole).

Lauchpad_Metal_1 Lauchpad_Metal_2 Lauchpad_Metal_3 Lauchpad_Metal_4

[ Posté le 2 juillet 2007 à 17:05 | pas de commentaire | ]

Lundi, 25 juin 2007

Water Rockets

Traduction: [ Google | Babelfish ]

Catégories : [ Bricolage | Science ]

Rocket_painted

Some months ago, I discovered water rockets while reading Make magazine's 5th issue. The idea is very simple: take a plastic soda bottle, fill it partly with water, add pressured air, and release. The practical difficulties are mainly the release mechanism and the recovery mechanism (i.e., releasing the parachute not too early and not too late). So two weeks ago I started to experiment with my brother-in-law, starting with the release mechanism and a simple bottle, as well as a standalone parachte. This (long) week-end, we built a full rocket, inclunding a nose holding the parachute and fins. It was painted red, because the transparent bottle was hard to spot in the sky, and even harder to find after landing in high grass.

Lauchpad Construction

Lauchpad

The lauchpad is made of one PVC tube that goes into the rocket, plus one wider tube around the first one that is part of the release mechanism and holds the rocket while on the tube. Three screws placed on the grey tube at 120° from each other hold the white tube in the middle of the grey one.

Inside_the_lauchpad

An O-ring is placed on the thinner tube so that the neck of the bottle will go just around it.

Release mechanism

Release_pin

The release mechanism relies on the wide ring just below the bottle's neck. Once on place on the tube, a metal pin will go around the neck and above the ring, preventing the bottle from taking off. The closeups will show the ring, just visible through the slot in the grey tube.

Release_pin_and_bottle Release_pin_and_bottle_closeup Release_pin_closeup

Release_rope

A rope connected to the pin allows to pull it from a safe distance. The rope is attached to the pole so that the pin doesn't jump to the face of the person pulling it (it hurts).

Currently, the release mechanism is not very reliable, it gets jammed from time to time and the rocket doesn't take off vertically. Also, the seal around the launch tube is not tight enough, there is some amount of leaking.

Rocket_on_launchpad
Coupling

The other end of the thinner tube is connected to the air compressor. Getting a tight enough connection here was not easy, but after several attempts we found one combination of rubber hoses and collars that works. More or less. It sometimes pops off.

Rocket Construction

Fin_glueing

Building the rocket was quite straightforward. One thing to remember: epoxy will hold the fins onto the rocket quite well, but it will break upon impact on the ground (understand: crash landing when the parachute doesn't open). Polyurethane glue (actually some kind of PU filling material) on the other hand will hold them in place and be flexible enough so that the bond won't break on impact. The aspect is pretty ugly, but it works. It just needs to dry overnight. Building a support for the bottle and the fins helps keeping them in place when drying. It's made of a cork screwed into a piece of wood of the proper height, and attached to a plank into which slots have beed sawn in order to hold the fins.

Parachute

The parachute is folded into the nose cone during the flight, and the nose is supposed to pop off when the rocket reaches its apogee. The problem was that more often than not, the cone didn't open, and the parachute didn't open at all. Finding the balance between a nose which is too tight on the rocket and a nose that falls off with a simple gust of wind before take off is very difficult. According to this website, I think the rocket should take off as vertically as possible, and the nose should hold only because of the force of the acceleration, and fall off as soon as the rocket is not in stable flight anymore. But the holes in the cone for decreaseing the pressure inside it is something to try, too.

Flight

This is the last flight of the week end, the only one that was more or less a success with the red rocket. The video was shot at 30 fps, therefore one frame below lasts 33 ms. One can see that the nose separates quite early from the body, probably because of the flight not being straight up.

Take_off_01 Take_off_02 Take_off_03 Take_off_04 Take_off_05 Take_off_06 Take_off_07 Take_off_08 Take_off_09 Take_off_10 Take_off_11 Take_off_12 Take_off_13

The original video clip is also available.

Bad Landings

These bad landings where quite soft ones, because the parachute did open and slowed the rocket down.

On_the_roof On_the_electric_line In_the_tree

There have been other bad landings where the nose of the rocket didn't fall off, and where the rocket fell down like a stone straight onto its nose. It's been bumped in many times, but it was still able to fly afterwards! The test bottle once crashed and had many bumps and creases, but it was possible to inflate it again, and the only tiny hole it had could be fixed with duct tape (blessed be the inventor of duct tape!)

[ Posté le 25 juin 2007 à 08:15 | pas de commentaire | ]

Samedi, 4 novembre 2006

Les extensions « Rivière » pour Carcassonne

Catégories : [ Bricolage | Jeux ]

http://www.carcassonne.de/familie.htm

© Hans im Glück Verlag

Carcassonne est un jeu de société où les joueurs construisent une carte en assemblant des carreaux tirés au hasard représentant des parties de ville, de route, de champ et des monastères. Le jeu dispose de plusieurs extensions (hors de prix comparées au jeu de base), mais aussi de deux extensions gratuites à fabriquer soi-même : la rivière et la rivière 2. La rivière se construit avant le début du jeu proprement dit, donc ses carreaux ne sont pas mélangés à ceux du jeu de base, et n'ont pas besoin d'être identiques.

carcassonne-riviere

Pour commencer, on peut télécharger les avers des carreaux sur le site du jeu (chercher les liens « Der Fluss » et « Der Fluss II »), puis imprimer les carreaux (qui sont au format PDF, en couleur). J'ai ensuite découpé les bords blancs, puis coupé chaque planche en deux parties (plus facile à coller). J'ai collé chaque demi-planche sur du carton de 2 mm d'épaisseur (approximativement l'épaisseur des carreaux originaux) avec de la colle blanche. Le truc, c'est d'encoller le carton (plutôt que le papier) et d'étaler la colle sur toute la surface avec une raclette (par exemple une vieille carte de téléphone), puis de coller le papier. On évite ainsi que le papier ne gondole, et ça sèche en quelques minutes. J'ai ensuite découpé les carreaux au cutter, pour me rendre compte que les marques sur les avers donnent des carreaux légèrement plus grandes que les originales, j'ai donc redécoupé les carreaux en utilisant un carreau du jeu original comme gabarit.

J'ai aussi scanné le revers d'un carreau du jeu de base et je l'ai imprimé en 24 exemplaires pour faire un revers à mes carreaux. J'ai découpé chacun de mes revers, puis je les ai collés un par un au dos de chaque carte, en utilisant la même technique que ci-dessus.

[ Posté le 4 novembre 2006 à 17:15 | 6 commentaires | ]

Vendredi, 20 octobre 2006

Plieur de T-shirt

Catégories : [ Bricolage ]

Je n'aime pas tellement l'idée de coller des videos dans mon blog (surtout que la pérennité de la video n'est pas assurée), mais le plieur de T-shirt en carton, il fallait absolument que je me le garde quelque part !

Un lien direct sur YouTube et sur Google Video.

[ Posté le 20 octobre 2006 à 00:54 | 1 commentaire | ]

Mardi, 26 septembre 2006

Autopsy of an Electric Toothbrush

Traduction: [ Google | Babelfish ]

Catégories : [ Bricolage | Science ]

http://www.oral-b.com/de/products/power/products_profcare5000.asp

© Oral-B.com

The battery of my four-and-a-half years old electric toothbrush had been near its end for months. Recently it was becoming very annoying: you couldn't use it for more than four minutes in a row (i.e., the time for two brushing sessions) before recharging it.

I therefore decided to change the battery, as I did for my electric shaver years ago. You are not supposed to be able to change the battery, but it is possible to open the body and take the battery out of it for recycling. It should therefore be possible to access it and work on it.

toothbrush_1

At the back of the stand there is a thingy that you can use to unscrew the bottom of the body of the toothbrush.

toothbrush_2

It opens with a spring and four very thin copper wires remain attached to the cap.

toothbrush_3

The battery is showing through the opening.

toothbrush_4

You take the core by pressing the tip of the body (where you normally put the toothbrush) against a solid surface (floor or wall). The core then slides out thrgouh the back.

toothbrush_5

The battery is encased in the plastic mount at the end of the core. It is clipped in, but you can take it apart quite easily.

toothbrush_6

After that, it becomes harder: the battery case is topped with a small PCB on which the battery is soldered from the bottom. Moreover, the PCB is attached to the motor by two metallic fins.

With Niko's help, we tried to unsolder the battery from the PCB, removing the excess tin with a soldering pump. It still wasn't possible to take it apart. We then resorted to cutting the battery's legs. It then slid out quite easily. But after that, the toothbrush would not start anymore. We then tried to apply the battery's voltage straight to the motor (first cutting the motor off from the PCB board), without success. We then applied 3.3V to the motor, which spun a bit before stopping for good.

I don't know what we did wrong when unsoldering the battery (heating a nearby diode too much? What else could have happened?), but there was no point changing the battery if the motor is broken. I then resorted to buying a new device.

[ Posté le 26 septembre 2006 à 19:51 | 2 commentaires | ]

Lundi, 28 août 2006

Pochette de CD en origami

Catégories : [ Bricolage ]

Lorsqu'on utilise des CD-R ou des DVD-R en boite cylindrique, on ne paye pas cher le CD, mais en revanche on n'a pas de boitier pour y placer le disque. Mais on peut facilement fabriquer une enveloppe en papier qui tient fermée toute seule, sans colle. Ce type d'enveloppe a été utilisé les trois dernières années durant la journée de démonstration de Linux organisé par le groupe d'utilisateurs de Linux de Jyväskylä pour distribuer des CD de Linux aux visiteurs. Au lieu d'une simple feuille blanche, on a utilisé une feuille imprimée avec un logo et du texte.

Matériel

  • une feuille de papier A4
  • une règle
  • un crayon

Procédure

pochette_cd_etape_1

1. Placer la feuille en position portrait. Tracer deux lignes, à 4,4 cm des bords droit et gauche de la feuille (les traits de crayon ne sont pas très visibles sur la photo ci-contre, cliquez dessus pour un agrandissement).

pochette_cd_etape_2

2. Plier selon les lignes.

pochette_cd_etape_3

3. Tracer une ligne à 4,4 cm du bord supérieur de la feuille.

pochette_cd_etape_4

4. Plier selon la ligne.

pochette_cd_etape_5

5. Retourner la feuille et plier un coin de telle sorte que les lignes de pliures se superposent.

pochette_cd_etape_6

6. Lorsqu'on retourne la feuille à nouveau, on obtient ceci.

pochette_cd_etape_7

7. Répéter les étapes 5 et 6 sur l'autre coin.

pochette_cd_etape_8

8. Replier les trois bords davantage, on obtient deux « oreilles ».

pochette_cd_etape_9

9. Replier le bas de la feuille de manière à ce que les coins du bas entrent dans les oreilles. Marquer le pli.

pochette_cd_etape_10

10. On obtient ceci.

pochette_cd_etape_11

11. Insérer le disque dans la pochette.

pochette_cd_etape_12

12. Replier la pochette et glisser les coins du bas sous les « oreilles ».

pochette_cd_etape_13

13. Et voila !

La même pochette peut contenir davantage de disques, il suffit de faire des bords moins larges que 4,4 cm et de faire une seconde pliure à quelques millimètres de la précédente de manière à donner de l'épaisseur à la pochette (compter 1 mm d'épaisseur par disque).

[ Posté le 28 août 2006 à 22:41 | 11 commentaires | ]