Näköradiomiehen ihmelliset siekailut
Traduction: [ Google ]
Catégories : [ TV/Cinéma/Spede ]
Antikvaari.fi
[ Posté le 28 mars 2015 à 23:45 | pas de commentaire | lien permanent ]
Traduction: [ Google ]
Catégories : [ TV/Cinéma/Spede ]
Antikvaari.fi
[ Posté le 28 mars 2015 à 23:45 | pas de commentaire | lien permanent ]
Traduction: [ Google | Babelfish ]
Catégories : [ Livres/Discworld ]

© Amazon.fr
Dick Simnel invents the steam locomotive and manages to get into business with Harry King. The Patrician orders Moist von Lipwig to take a closer look at this phenomenon that gets all of Ankh-Morpork excited (even Drumknott). Meanwhile, extremist dwarfs are causing trouble in Uberwald, accusing King Rhys to stray from “true dwarfishness”. Moist helps King and Simenl building the first railroad to Sto Lat and to Quirm, allowing fresh goods to arrive still fresh to Ankh-Morpork. He discovers that goblins are very interested in the train (and even start building an underground railway near Quirm). While a conference between the kings of dwarfs and trolls takes place in Quirm, the Patrician orders Moist to build a railway to Bonk in Uberwald. The task is huge and the time is limited, but Moist eventually understands that with King Rhys away from Uberwald, the extremist dwarfs will try to take power. Rhys is then smuggled quietly out of Quirm and onto the train to Bonk. The journey is long and they are attacked several times by rebel dwarfs. When they finally arrive in Bonk, Rhys reasserts his right to the Scone of Stone and even announces that he is actually female.
[ Posté le 24 mars 2015 à 18:30 | 1 commentaire | lien permanent ]
Traduction: [ Google ]
Catégories : [ TV/Cinéma/Spede ]

© listal.com
[ Posté le 21 mars 2015 à 23:37 | pas de commentaire | lien permanent ]
Traduction: [ Google | Babelfish ]
Catégories : [ Bière/Badger ]
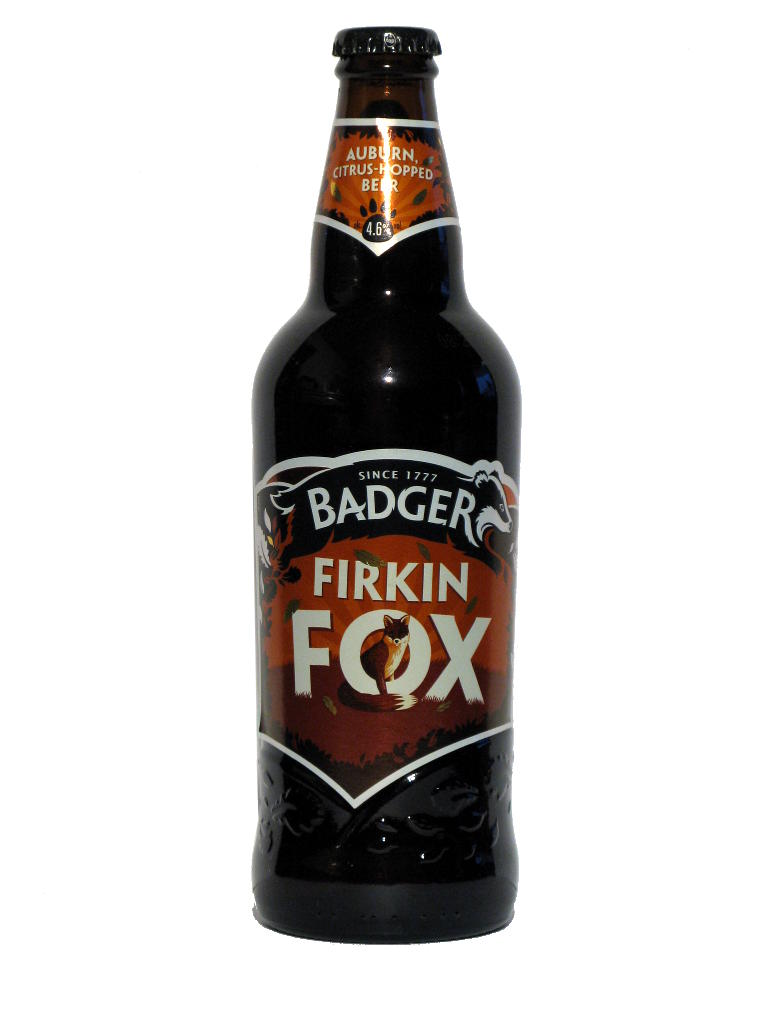
“biscuity… qualities of our malts… citrus hop charge of Celeia and Cascade hops”
Just another ale, but a very good one. Contains malted barley.
Hall & Woodhouse Ltd., Blandford, Dorset, England. 4.6% alcohol.
[ Posté le 21 mars 2015 à 23:27 | pas de commentaire | lien permanent ]
Traduction: [ Google ]
Catégories : [ TV/Cinéma/Spede ]

Wikipedia
[ Posté le 7 mars 2015 à 23:45 | pas de commentaire | lien permanent ]
Traduction: [ Google | Babelfish ]
Catégories : [ Informatique ]
I just switched from using Xterm to using evilvte but then I noticed that evilvte cannot be resize smaller. It can become bigger, but there is no way back. Then I learned that URxvt does everything I want (it even uses the same font as Xterm by default) with a bit of configuration. And it's much more lightweight than evilvte (it doesn't use GTK, that helps).
This is my.Xresources (everything you need to know is in the man page).
*VT100*foreground: black
*VT100*background: white

URxvt.scrollBar: false
URxvt.secondaryScreen: 1
URxvt.secondaryScroll: 0
URxvt.perl-ext-common: default,matcher
! old keyword
URxvt.urlLauncher: firefox
! new keyword
URxvt.url-launcher: firefox
URxvt.matcher.button: 1
URxvt.keysym.C-Up: \033[1;5A
URxvt.keysym.C-Down: \033[1;5B
URxvt.keysym.C-Left: \033[1;5D
URxvt.keysym.C-Right: \033[1;5C
URxvt.keysym.C-Page_Up: \033[5;5
URxvt.keysym.C-Page_Down: \033[6;5
You need to merge it with X's resource database
xrdb -merge .Xresources
and then you can run the terminal.
And Firefox just restored the --remote option, so wmnetselect
should even work again (until next time, anyway). Let's say it was an
opportunity to learn about stuff…
[ Posté le 6 mars 2015 à 19:09 | pas de commentaire | lien permanent ]
Traduction: [ Google | Babelfish ]
Catégories : [ Informatique ]
Since I built a customized Debian package I could as well have my own repository. I started from this tutorial but it's a bit out of date and has a dead link to the reprepro short-howto, so here's a record of what I did.
First, you will need to install the reprepro package.
Origin, Label and Description are free-form fields. Codename is the
same as my current Debian version, and Architectures matches the
architectures I'm using. Then run:
mkdir -p packages/debian/conf

cd packages/debian

cat <<EOF > conf/distributions
Origin: Matthieu
Label: Mathieu's Personal Debs
Codename: wheezy
Architectures: i386 amd64 source
Components: main
Description: Matthieu's Personal Debian Repository
SignWith: yes
DebOverride: override.wheezy
DscOverride: override.wheezy
EOF

cat <<EOF > conf/options
verbose
ask-passphrase
basedir .
EOF

touch conf/override.wheezy
Now's the time to add the packages. Since
SignWith was set to yes in the
conf/distributions file, your GPG key will be used for signing the manifest
files.
reprepro -Vb . includedeb wheezy  /src/evilvte_0.5.1-1+custom_amd64.deb
reprepro -Vb . includedsc wheezy  /src/evilvte_0.5.1-1+custom.dsc
Next configure your system to use the newly created repository by adding to your
/etc/apt/sources.list (replace $HOME with the actual path to your
repository):
deb file:$HOME/packages/debian/ wheezy main
deb-src file:$HOME/packages/debian/ wheezy main
Add your GPG key to apt's keyring (replacing KEY-ID with the one of the GPG key that was used when adding the packages earlier):
gpg -a – export KEY-ID | sudo apt-key add -You can now run
apt-get update and it should pick the content of your local
repository. You can check that it is indeed the case:
apt-cache showpkg evilvte
Package: evilvte
Versions:
0.5.1-1+custom …
0.5.1-1 …
…
[ Posté le 5 mars 2015 à 23:19 | pas de commentaire | lien permanent ]
Traduction: [ Google | Babelfish ]
Catégories : [ Informatique ]
Since I started with Linux, back in 1997, my xterm have been using always the same font: a bitmap, fixed font which produces 6x13 pixels glyphs. I'm convinced that a bitmap font is the best possible choice for not-so-high resolution LCD monitors (I have a 17" 1280x1024 monitor which results in a 96 dpi resolution) where any vector font would inevitably produce aliased or fuzzy glyphs. My bitmap font is crisp and has no rainbow edges (who in his right mind could imagine that subpixel antialiasig is a good idea?).
With the xterm, I could simply specify the font as 6x13 and it would use it. That was simple, because it was meant for it.
Today I switched from pure X11 xterm to GTK-based evilvte and while evilvte is apparently a great tool, it didn't want to use my beloved 6x13 bitmap font. It would use 6x12 or 7x13, but not the one in the middle. The font is however available on the system through fontconfig, since I could find it withfc-match:
$ fc-match Fixed-10:style=semicondensed
6x13-ISO8859-1.pcf.gz: "Fixed" "SemiCondensed"
But evilvte, while showing "SemiCondensed" as an option in its font dialog, just seemed to ignore it. The fontconfig documentation mentions that one can trigger debug output by setting an environment variable
FC_DEBUG=1. With it,
I could see how Pango (GTK's font managemnt system) was interacting with
fontconfig:
fc-match Fixed-10:semicondensed
Match Pattern has 19 elts (size 32)
	family: "Fixed"(s) …
	style: "semicondensed"(s)
	slant: 0(i)(s)
	weight: 100(i)(s)
	width: 100(i)(s)
…
Pattern has 18 elts (size 18)
	family: "Fixed"(w)
	style: "SemiCondensed"(w)
	slant: 0(i)(w)
	weight: 100(i)(w)
	width: 87(i)(w)
…
	file: "/usr/share/fonts/X11/misc/6x13-ISO8859-1.pcf.gz"(w)
That's the right font file.
While Pango:python mygtk.py "Fixed SemiCondensed 10" Match Pattern has 20 elts (size 32) family: "Fixed"(s) … slant: 0(i)(s) weight: 80(i)(s) width: 87(i)(s) … Pattern has 18 elts (size 18) family: "Fixed"(w) style: "Regular"(w) slant: 0(i)(w) weight: 80(i)(w) width: 100(i)(w) … file: "/usr/share/fonts/X11/misc/7x13-ISO8859-1.pcf.gz"(w)
And that's not the right font file…
Notice the important difference: fc-match asks for a weight of 100 (and style
SemiCondensed) while Pango asks for weight 80 and width 87 (which is
apparently equivalent to semi-condensed). Since my font had a weight of 100,
it was never selected. However, when requesting a bold version (fc-match
Fixed-10:semicondensed:bold or python mygtk.py "Fixed SemiCondensed Bold
10") the same font is found (6x13B-ISO8859-1.pcf.gz, which is the bold
counterpart of my font). That took me several hours to find out.
Since the root of the problem seemd to be the weight, I needed to find out how to make Pango tell fontconfig to use a different weight, since there is apparently nothing between “Regular” (Pango 400, fontconfig 80) and “Bold” (Pango 700, fontconfig 200). And then, completely by accident, I found out there is actually a middle value: “Medium” (Pango 500, fontconfig 100), which is exactly what I neeed. But the outdated PyGTK documentation and the well-hidden man page (and very little help from Google and DuckDuckGo in finding a decent documentation for Pango, I must say) didn't make this any easy.
So finally, the magic font description I put in evilvte's config is “Fixed Medium SemiCondensed 10”. With it, Pango selects the font I want:$ python mygtk.py "Fixed Medium SemiCondensed 10" Match Pattern has 20 elts (size 32) family: "Fixed"(s) … slant: 0(i)(s) weight: 100(i)(s) width: 87(i)(s) … Pattern has 18 elts (size 18) family: "Fixed"(w) style: "SemiCondensed"(w) slant: 0(i)(w) weight: 100(i)(w) width: 87(i)(w) … file: "/usr/share/fonts/X11/misc/6x13-ISO8859-1.pcf.gz"(w)
mygtk.py script is a simple GTK tool I wrote for the purpose of using a
specific Pango font description and producing the fontconfig debug output.
This is the script:
import gtk
import pango
import gobject
import sys

window = gtk.Window(gtk.WINDOW_TOPLEVEL)
tv = gtk.Label("Hello World")
tv.modify_font(pango.FontDescription(sys.argv[1]))
window.add(tv)
tv.show()
window.show()
gobject.timeout_add(100, gtk.main_quit)

gtk.main()
[ Posté le 5 mars 2015 à 22:14 | pas de commentaire | lien permanent ]
Traduction: [ Google | Babelfish ]
Catégories : [ Informatique ]
Today I switched from using xterm (which I had been using for the past 15
years at least) to using evilvte. The reason is that evilvte allows to click
on URLs and opens a new tab in Firefox, while xterm does not. Since Firefox
removed the --remote option, wmnetselect did not anymore allow me
to open a copied URL. Since wmnetselect has no been updated since forever
and has even been removed from Debian, I thought it was time for a radical
change (yes, I changed my terminal emulator because of the Web browser. I
know).
Evilvte is one of those simplistic tools that you configure by editing the
source code (the config.h, really), so I thought that after having done
that, I may as well make my own custom Debian package. It wasn't too hard, but
since I don't plan to do this regularly, here's the process.
apt-get source evilvteEnter the directory
cd evilvte-0.5.1
Edit the config file (or whatever you want to do for your own package), save
it in the right place. In my case, the package contained a debian/config.h
customized by the package's maintainer, so I needed to modify this one rather
than the src/config.h one. During the building of the package,
src/config.h is overwritten by debian/config.h.
Then edit debian/changelog and add a new entry. By doing that, you need to
choose a new version number. I wanted to keep the original version number of
the package (0.5.1-1) but make it known that it was slightly newer than
0.5.1-1: I decided to go for 0.5.1-1+custom (after discovering that my first
choice, 0.5.1-1~custom, means that the package is slightly older than 0.5.1-1
and would therefore have been replaced during the next apt-get dist-upgrade)
by 0.5.1-1 . The description of the change is simply “Custom configuration”.
For the rest, follow the example of the existing entries in the changelog. Be
careful, there are two spaces between the author and the date.
If you have changed the upstream source code instead of only Debia-specific files, the package building helpers will record a patch for your and let you write some comments in the patch file, based on the new entry in the changelog.
Then you just need to build the package:dpkg-buildpackageIt will probably ask you for your GPG passphrase (when signing the package), and after that, you're done. The newly created package is in the parent directory, and ready to be installed.
cd ..
sudo dpkg -i evilvte_0.5.1-1+custom_amd64.deb
That's it!
[ Posté le 5 mars 2015 à 21:14 | 3 commentaires | lien permanent ]
Développeur logiciel qui écoute des bandes originales de film, regarde de vieilles séries télé, boit du thé et mange du chocolat.

Pluie à 8h
| 05 | 07 | 08 | 09 | 10 | 12 | 13 | 14 | 15 | 16 | 17 | 18 | ||||||||||||
| 00 | 01 | 06 | 07 | 08 | 09 | 10 | 12 | 13 | 14 | 15 | 16 | 17 | 18 | 19 | 20 | 21 | 22 | 23 |